Nothing is more comforting than the aroma of freshly baked loaves of bread. Bread baking is based on a different theory than cake, cookies, pies, and tarts. Bread is regarded as a basic and necessary component of everyday food in many parts of the world. Its unusual combination of ingredients such as flour, yeast, water, salt, and, most importantly, time necessitates a different approach.
Baking brings your awareness to the present moment. According to psychologists, baking stimulates our senses of smell, touch, taste, and finally, seeing the end result. They say that having something tangible to show for your efforts will give you a sense of accomplishment. When it comes to bread baking the ritual of combining ingredients, kneading dough, and watching bread rise can be both calming and therapeutic. It’s a fantastic leisure activity that even inexperienced people can enjoy.
If your first attempt at baking bread was a disaster, or if you are about to bake bread for the first time, the following tips should help you get started.
Basic ingredients used in baking bread
1.Flour
Wheat flour is an essential ingredient in the baking of bread. It comes in four varieties that are commonly used in bread recipes: all-purpose flour, bread flour, whole wheat flour, and white whole wheat flour.
All-purpose flour: It contains between 9 and 11 percent gluten. It is typically made of a blend of hard and soft wheat and comes in two varieties- Bleached and unbleached. Both flours are suitable for use in bread recipes.
Bread flour: The high gluten content, usually between 11 and 14 percent, makes the dough more elastic and easier to work with, resulting in light-textured breads. Bread flour can be substituted for all-purpose flour, but keep in mind that bread flour requires more liquid due to its higher gluten content. When using all-purpose flour, you have the option of adding more flour or less water.
Whole-wheat flour: The whole wheat berry, including the oil-rich bran and germ, is used to make whole wheat flour. Whole wheat flour contains the most gluten, sometimes up to 16 percent. Whole wheat flour produces intensely nutty flavors and a range of fine to coarse textures, resulting in chewy crusted breads.
White-whole wheat flour: White whole wheat flour is made from a new type of light-colored and sweet white spring wheat. Its gluten percentage is around 12%, making it a good substitute for all-purpose flour with no loss of light texture. It has the same nutritional value as whole wheat flour but a milder taste.
2.Yeast
Yeast is responsible for a loaf of bread’s lovely rise. The most difficult aspect of baking bread is determining which yeast to use in the first place: active dry, instant, or rapid-rise?
Active dry yeast: This yeast looks like small, tan granules the size of poppy seeds when it comes out of the package. The yeast has a long shelf life in this state if stored in a cool, dry place. Warm water is required to activate the little organisms that give your bread its lift. When the yeast begins to activate and bubble, the mixture is added to the rest of the bread recipe.
Instant yeast: Instant yeast, also known as rapid-rise yeast, quick-rise yeast, or bread machine yeast, is sold in small packets or jars and is suitable for everyday bread baking. Because instant yeast does not need to be proofed in water, the granules can be mixed in with the dry ingredients right away.
Fresh yeast: It has the texture of very crumbly eraser and sold in small cakes or bars. It perishes very quickly compared to active dry yeast, and instant yeast. It yeast should be refrigerated and used within 2 weeks of time. Before use fresh yeast needs to be crumbled and proofed.
3.Salt
When baking bread, salt plays an important role in the final outcome of the recipe. Salt strengthens the gluten network and aids the dough in retaining the carbon dioxide gases formed during fermentation and proofing, which contributes to the loaf’s volume. There are about 4 types of salt- Himalayan rock salt, kosher salt, Sea salt, table salt. It is always recommended to use the type of salt the recipe calls for.
4.Water
Despite the fact that it is easy to overlook, Water is an essential ingredient in making bread dough. Gluten is formed in the presence of water. Water acts as a solvent and dispersant (for salt, sugar, and yeast). Water is required for yeast fermentation and reproduction; softer dough ferment faster than dry dough. The consistency of bread dough is determined by water.
Most tap water is suitable for baking bread. Very hard water, on the other hand, will toughen the dough and slow fermentation, whereas very soft water will soften the dough and make it sticky. In these cases, bottled mineral water is preferable.
5.Butter
As the dough bakes, the butter melts and creates steam, which traps in the dough and creates air pockets. When the dough cools, the air pockets transform into delicate layers of flaky dough. Butter does more than just add flavor; it also adds texture.
- Butter with a high fat content is preferred for some enriched bread recipes.
- When using salted butter, reduce the salt in the recipe.
- For rich bread recipes, add butter last.
6.Eggs
The addition of eggs to the dough aids in its rising. Because eggs are a leavening agent, a bread dough rich in eggs will rise very high. Furthermore, the yolk fats help to tenderize the crumb and lighten the texture slightly. It is recommended to use only the specified number of eggs given in the recipe.
7.Milk
To add flavor to the bread loaf, milk is used. It enriches the dough and imparts a creamy color, soft crumb, and golden crust to the bread.
Kneading
Kneading is a crucial step in the bread-baking process. The flour contains two important protein substances, gliadin and glutenin. When flour and water are combined and kneaded by hand or machine, these two proteins combine to form gluten. This increases the dough’s elasticity and structure.
Kneading equally distributes yeast, and evens out the temperature of the dough, allowing for uniform proofing and baking of the final product. Properly developed gluten allows the dough to hold the gas bubbles produced by the baking soda or yeast in the recipe, resulting in airy pockets and height within a loaf of bread.
How to knead dough?
Step 1- Clean and dry your workstation sprinkle some flour to prevent the dough from sticking to the countertop.
Step 2- Now start kneading the dough only with the heel of your hands. Push it down and out, fold and turn by lengthening and stretching the dough occasionally.
Step 3- Continue to knead for 5-7 minutes or until the dough is smooth and supple. If the dough gets sticky add little flour to it.
Windowpane test
To ensure that you are not over-kneading the dough, perform the windowpane test. Break off a small piece of dough and gently stretch it out until it’s thin enough to see through to perform the windowpane test. If you can see through it, you’ve finished kneading. Continue kneading if the dough breaks before you can stretch it out that thin.
Fermentation and Proofing process
Yeast and friendly bacteria convert starches into sugars, producing flavor and the carbon dioxide responsible for bread’s light and airy crumb. When the dough has finished proofing, it should appear fuller and doubled in size. Allow it to proof longer if it’s tight and dense; if it’s airy and about to collapse, it’s gone too far.
Form
Use a light touch, if the dough is overworked, it can be difficult to shape. If the dough begins to feel taut, cover with a towel and set aside for 10 minutes to relax.
Prepare the pan
It is essential to properly grease the bread pan in order to remove the baked loaf of bread from the oven. Shortening, cooking oil, or butter should be used to thoroughly grease the loaf pan. Using your fingers or a folded paper towel, spread it evenly on the bottom and all sides of the pan. To keep white or whole wheat bread from sticking, use coarse cornmeal. Place a handful of cornmeal in the loaf pan and turn to coat the bottom and sides.
Turning the pan over after the bread has baked is all that is required to get it out of the pan. The bread will simply fall out.
Fill the bread pan
Most pans should be filled no more than two-thirds full to allow for rising during baking. Using a spatula, knife, or the back of a spoon, spread the batter evenly in the pan.
Bread pan:
It makes a difference what you bake the bread on or in. A baking pan aids in the retention of shape during baking of softer, more malleable dough. The typical loaf pan will yield a taller loaf that is similar in shape to store-bought loaves. This is due to the sides of the pan forcing the dough to maintain its shape while baking.
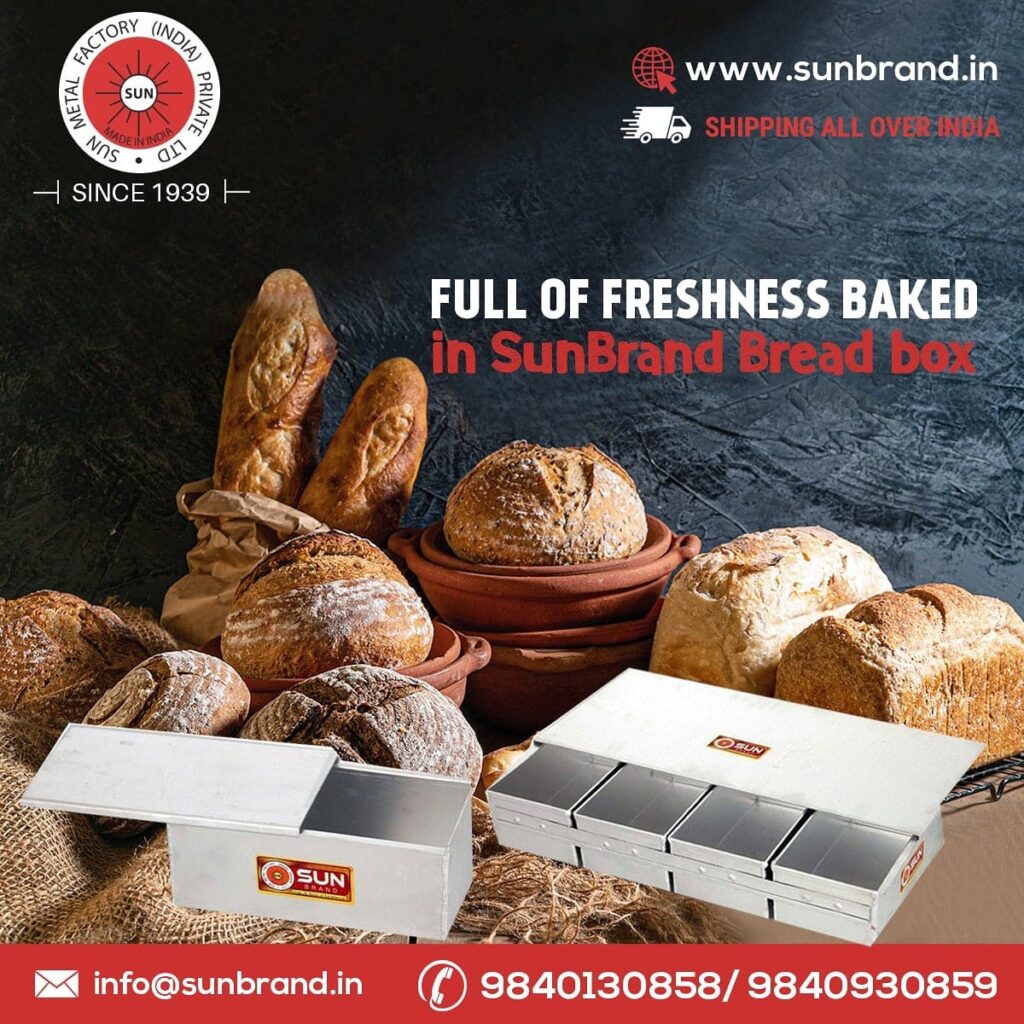
It is essential for a baker to have a bread pan in his/her pantry to bake some delectably delicious breads often. SunBrand makes bread pans with lids/shutters that keep the shape and produce softer, fluffier loaves. You can also bake multiple loaves at once with the SunBrand bread box, which has 4-6 compartments.
Bake Bread
Quick breads should be baked in the center of a preheated oven. A moderate oven is required for quick bread loaves. Most bake at 350°F to 375°F, but it is always recommended to check the recipe. Allow enough space around each pan, as well as between pans and the sides of the oven, for heat to circulate when baking more than one pan at a time.
Test for doneness
Insert a wooden pick into the center of the loaf or coffeecake to check for doneness. The bread is done when the pick comes out clean or with a few moist crumbs clinging to it. To determine doneness, follow the directions. Bread loaves will usually rise to the edge of the pan and crack on top. When the bread is done, the streak of batter visible through the crack will appear dry, and the bread will pull away slightly from the sides of the pan.
Continue to hone your kneading skills, and you’ll be making bakery-quality bread loaves in no time. The hints will make your bread baking process further simpler and easier. It only takes flour, water, yeast, and time. Have a Bready weekend!